Some basic tips for troubleshooting when SItoA won’t load.
https://vimeo.com/71046241
[SItoA] Troubleshooting plugin loading problems
Reply
Some basic tips for troubleshooting when SItoA won’t load.
https://vimeo.com/71046241
Starting with version 2.8, SItoA no longer supports the Softimage motion blur property. Instead, you use the Arnold Parameters property to control transformation and deformation motion blur.
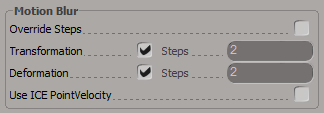
However, you cannot add an Arnold Parameters property to a camera (at least not using the SItoA custom menus, which will tell you that a camera is “is not a valid Object to add Arnold Parameters to”). Here’s a couple of ways to work around that:
cam = Application.Selection(0)
cam.AddCustomProperty( "Arnold_Parameters" )
There are several ways you can do it.
In your Maya.env file, add this line:
solidangle_LICENSE=XXXX@SERVER
where XXXX is the port number, and SERVER is the name or IP address of the computer.
Maya.env is located in your user Library. For example: /Users/steve/Library/Preferences/Autodesk/maya/2014.
By default, the Library folder is a hidden folder, so you may need to un-hide the Library folder.
sudo nano /etc/launchd.conf
setenv solidangle_LICENSE XXXX@SERVER
If you don’t want to restart your Mac just yet, you can try setting the environment variable like this (it will last until you restart your machine):
launchctl setenv solidangle_LICENSE XXXX@SERVER
If you want the RLM license server to automatically start everytime you restart or turn on your Mac, you need to create a launch daemon. Don’t worry, it’s not as scary as it sounds 🙂
First, you need create a launchd property list (.plist) for RLM. It will look something like this:
<?xml version="1.0" encoding="UTF-8"?>
 <!DOCTYPE plist PUBLIC "-//Apple//DTD PLIST 1.0//EN" "http://www.apple.com/DTDs/PropertyList-1.0.dtd">
 <plist version="1.0">
 <dict>
        <key>Label</key>
        <string>com.solidangle.rlm</string>
        <key>ProgramArguments</key>
        <array>
        <string>/PATH/TO/RLM/rlm</string>
        <string>-c</string> <string>/PATH/TO/RLM/arnold.lic</string>
        <string>-dlog</string> <string>/PATH/TO/RLM/solidangle.dlog</string>
        </array>
        <key>RunAtLoad</key>
        <true/>
 </dict>
 </plist>
This plist file basically tells the system to start rlm with the -c and -dlog flags, like this:
/Users/stblair/solidangle/RLM/rlm -c /Users/stblair/solidangle/RLM/rlm/arnold.lic -dlog /Users/stblair/solidangle/RLM/rlm/solidangle.dlog
The -c flag isn’t necessary if the license file is in the same folder as the RLM binary executable.
Here’s an example com.solidangle.rlm.plist. Download it, and use TextEdit to change the paths to match the RLM location on your computer, and then save the RLM plist file in /Library/LaunchDaemons/. Note that this download plist assumes that the license file is in the same folder, and therefore omits the -c flag.
For example:
sudo cp com.solidangle.rlm.plist /Library/LaunchDaemons
Note: The plist file needs to be owned by root, otherwise you won’t be able to load the plist. If necessary, you can change the owner like this:
sudo chown root /Library/LaunchDaemon/com.solidangle.rlm.plist
Finally, you need to load the plist:
sudo launchctl load -w /Library/LaunchDaemon/com.solidangle.rlm.plist
The license server will now automatically start, even after a restart or power down of the machine.
You can check the license server by opening a Web browser and going to localhost:5054.


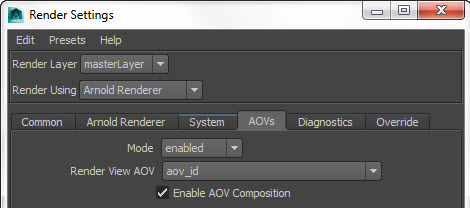
I don’t think this set up works if you plug a Standard into the beauty of the aiWriteColor (eg Standard > aiWriteColor > Standard). With that set of connections, I could never get the opacity right in both the Beauty and the Mask AOVs.
