[MtoA] Recipe for linear workflow


Ingredients

  • 1 x Maya
  • 1 x MtoA
  • 1 x Monitor calibrated to sRGB
  • Linear textures

Procedure

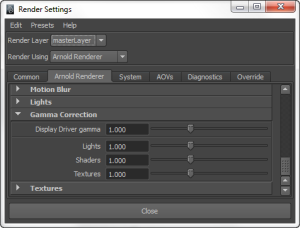
  1. In the Render Settings, set all the Arnold gamma correction settings to 1.0.
    ArnoldRenderSettingsGamma
  2. Set your Render View > Display to 32-bit floating-point (HDR).
  3. Click Render View > Color Management, and in the viewColorManager Attribute Editor, set the Image Color Profile to Linear sRGB (that is, your input textures are in linear space).
    ColorManager
  4. Render to EXR or some other linear floating point format.

hat tip: Fred

Just for kicks: Printing out shading trees


kick -tree prints the shading network for a shader node. For example, given this:

polymesh
{
 ...
 shader "Sources.Materials.DefaultLib.Material.standard.SItoA.41000.1" 
 ...
}

standard
{
 name Sources.Materials.DefaultLib.Material.standard.SItoA.41000.1
 
}

You can print out the shader tree for the standard shader like this:

set ASS_FILE=//Projects/Support/Arnold_Scenes/example.ass
set NODE=Sources.Materials.DefaultLib.Material.standard.SItoA.41000.1
set SHADER_PATH=%SITOA_BIN%
%KICK_PATH%\kick.exe -tree %NODE%  -i %ASS_FILE% -l %SHADER_PATH%

For a [simple] shading tree that looks like this:
SimpleTree
You would get this:

standard:Sources.Materials.DefaultLib.Material.standard.SItoA.41000.1
  |
  +-Kd_color = txt2d_image_explicit:Sources.Materials.DefaultLib.Material.Image.SItoA.41000.2
  |   |
  |   +-tex = sib_image_clip:Sources.Materials.DefaultLib.Material.noIcon_pic.SItoA.41000.3
  |
  +-opacity = txt2d_image_explicit:Sources.Materials.DefaultLib.Material.Image.SItoA.41000.2
      |
      +-tex = sib_image_clip:Sources.Materials.DefaultLib.Material.noIcon_pic.SItoA.41000.3

max depth:       2
total shaders:   5
cycles detected: 0

shader counts:
  2 txt2d_image_explicit
  2 sib_image_clip
  1 standard

one-to-many connections:
  2 txt2d_image_explicit:Sources.Materials.DefaultLib.Material.Image.SItoA.41000.2
  2 sib_image_clip:Sources.Materials.DefaultLib.Material.noIcon_pic.SItoA.41000.3

Notice that txt2d_image_explicit and sib_image_clip are counted twice, because those branches are plugged into two different ports on the standard shader.

[SItoA] Applying materials to standins


In Softimage, a standin object is the polygon mesh, hair, or point cloud with the Arnold_Standin property.

If you apply a material to a standin, that material will override any materials specified in the ASS file referenced by the standin. If you don’t want that to happen, give your material a name that starts with “Scene_Material” or “Standin_Material” (it doesn’t matter if you use uppercase or lowercase for the names).

If you do that, the standin object will use that material, but the objects in the ASS file will use the materials saved in the ASS file.

Here’s what you get in an exported ASS file. If SItoA finds a standin with a material name that starts with “scene_material” or “standin_material”, it exports a procedural node with no material.

procedural
{
 name standin-cube.SItoA.41000
 dso "\\server\project\Arnold_Scenes\XSI_Man.ass"
 min -4 0 -4
 max 4 0 4
 matrix 
  1 0 0 0
  0 1 0 0
  0 0 1 0
  0 0 0 1 
}

Otherwise, if you name the standin material something else, the procedural node will include a shader node for that material:

procedural
{
 name standin-cube.SItoA.41000
 dso "\\server\project\Arnold_Scenes\XSI_Man.ass"
 min -4 0 -4
 max 4 0 4
 matrix 
  1 0 0 0
  0 1 0 0
  0 0 1 0
  0 0 0 1 
 shader "Sources.Materials.DefaultLib.Test.standard.SItoA.40000.1" 
 declare procedural_shader constant ARRAY NODE
 procedural_shader "Sources.Materials.DefaultLib.Test.standard.SItoA.40000.1" 
}

Switching between different versions of MtoA


If you have several versions of MtoA, you can switch between them by editing your Maya.env and mtoa.mtd files before you start Maya. These two files are located under your MAYA_APP_DIR folder.

For example, C:\Users\SOLIDANGLE\Documents\maya\2013-x64\Maya.env.

MAYA_RENDER_DESC_PATH = C:\solidangle\mtoadeploy\2013.0.22.0
PATH = %PATH%;C:\solidangle\mtoadeploy\2013.0.22.0\bin

And C:\Users\SOLIDANGLE\Documents\maya\2013-x64\modules\mtoa.mod:

+ mtoa any C:\solidangle\mtoadeploy\2013.0.22.0

The mtoa.mod file is put there by the MtoA installer.

The MtoA installer always wants to remove any other installed version, so if you want to keep multiple versions around, you can do one of the following:

  • Extract the files yourself (for example, using 7zip)
  • Make copies of each MtoA version before you uninstall them.

For example, if you have MtoA 0.21 installed in

C:\solidangle\mtoadeploy\2013

copy that folder to

C:\solidangle\mtoadeploy\2013-0.21.0

Then install MtoA 0.22 (during the install, you may want to change the default install folder to something like C:\solidangle\mtoadeploy\2013-0.22.0).

After that, you’ll have both MtoA 0.22 and 0.21, and you can switch between them.
[MtoA] Editing Arnold attributes on multiple objects


If you need to change the same Arnold attributes on many nodes, use the Attribute Spreadsheet. For example, suppose you wanted to turn off the Opaque attribute on a number of objects in your scene. Here’s how to do it:

  1. Select the objects.
  2. Press the Down arrow (aka Pick Walk) to select the shape nodes.
  3. Open the Attribute Spreadsheet.
  4. Click the All tab, and find the Ai (Arnold) attributes you want to change. Drag across all rows, and then type “off” in the last row.
    AiAttributeEditor