Auto-instancing in Arnold 6.0.2


Controllable auto-instancing on ASS procedurals: You can now disable the default automatic instantiation of procedurals pointing at the same ASS file with the auto_instancing parameter on each procedural or by the procedural_auto_instancing option. This workaround is sometimes useful when overriding procedural parameters with operators.

Arnold 6.0.2 release notes https://docs.arnoldrenderer.com/x/1gGvBg

So, what’s all that mean?

It means that if you load the same ass file many times, Arnold will load the ass file just one time, and then automatically create instances of that. For example, if I load an ass file three times, I will get two instances.

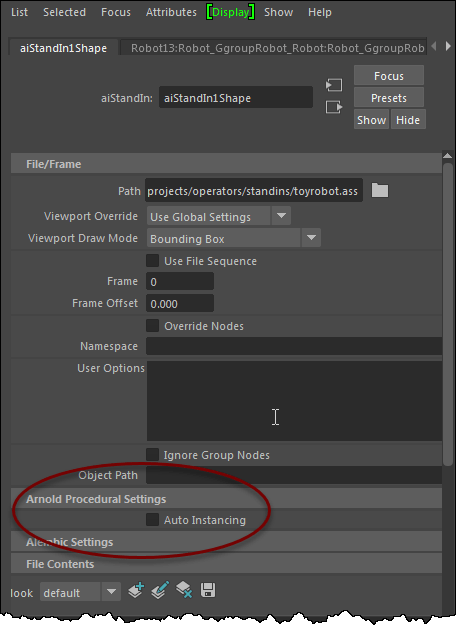
In previous versions, this was known as the procedural cache, and it was a global option. Now it’s called auto_instancing and you can set it on each procedural node (aka aiStandin in Maya).

In general, you want auto instancing, because instancing is more efficient than loading the same ass file over and over. But if you’re using operators to apply different looks to the same procedural, you need to turn off auto instancing. Otherwise all the procedurals will have the same look (because they all be instances of the same one procedural).

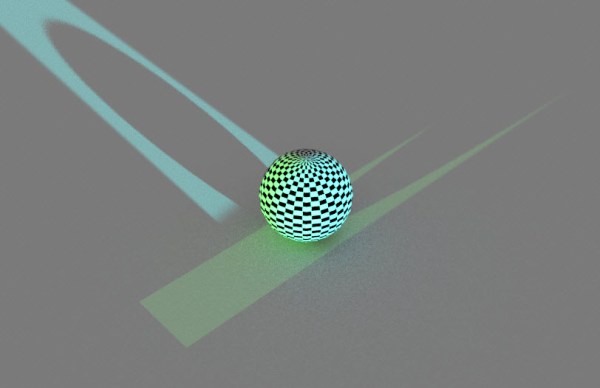
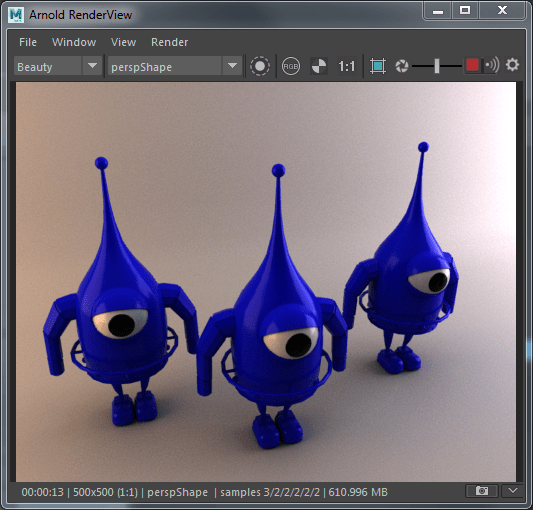
For example, with auto instancing on, I get this, even though I’ve assigned different looks to each procedural (standin):

Everything has the same look with auto instancing on

I can also tell from the Arnold log that I’m getting instances. Note that 2 are reused

| ---------------------------------------------------------
| ass file cache           
|   unique (loaded from disk)              1 (33.33%) 
|   reused (found in cache)                2 (66.67%) 
|   total referenced .ass files            3 (100.00%) 
| ---------------------------------------------------------

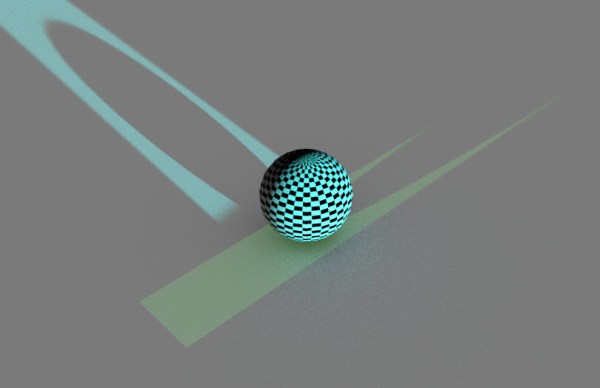
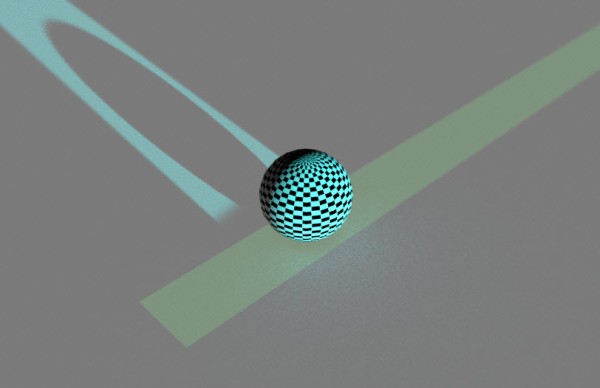
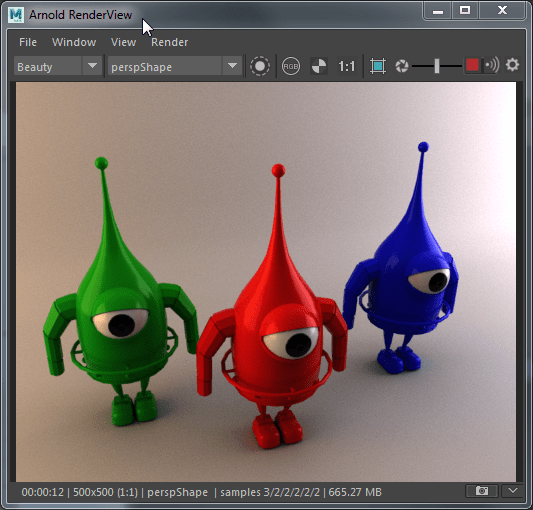
If I turn off auto instancing (in the procedural parameters)

then I get three different looks

In the Arnold log, that looks like this (0 reused means 0 instances)

| ---------------------------------------------------------
| ass file cache
| unique (loaded from disk) 1 (100.00%)
| reused (found in cache) 0 (0.00%)
| total referenced .ass files 1 (100.00%)
| ---------------------------------------------------------

backdoor Arnold: setting visibility


If you want to control object visibility with operator, or the Arnold Python API, or by editing an ASS file, you need to understand Arnold’s visibility parameter.

In the UI, the object visibility options look like a bunch of separate parameters:


but in Arnold, all those options are stored in one visibility parameter.

For example, if an object is visible to the camera (primary visibility), and to transmission (both diffuse and specular), then that’s visibility 13.

Why 13? Because 13 = 1 + 4 + 8

  • camera rays = 1
  • diffuse transmission rays = 4
  • specular transmission rays = 8

The Arnold visibility parameter tells Arnold the rays to which the object is visible.

  • visibility 0 means the object isn’t visible to any rays
  • visibility 255 means the object is visible to all rays
  • visibility 253 means the object isn’t visible to shadow rays (so the object does not cast shadows).

Here’s the decimal values for all the different ray types.

To figure out the visibility, just add up the values for the rays you want.

Ray typeDecimal Value
Camera (Primary Visibility)1
Shadow (Casts Shadows)2
Diffuse transmission4
Specular transmission8
Volume16
Diffuse reflection32
Specular reflection64
SSS (subsurface)128

The case of the too-low OptiX version


In this case, when the user tried to render after enabling the OptiX denoiser, they got this error:

ERROR | [gpu] OptiX version 0.30.91 is lower than the minimum required version 5.0.0

This was with MtoA 3.0.1, which means Arnold 5.1.1.0

So, that means there is an incompatible version version of the OptiX library on the system, and it’s being loaded instead of the OptiX that ships with MtoA.

I probably could have just checked the PATH setting, but I used Process Monitor to absolutely sure, and I found this:

pml_furryball_optix

The problem is that another renderer added itself to the PATH. That’s a bad thing 😉

The solution? Remove that folder from PATH. Create a batch file or wrapper script to set the required environment when you start Maya to use the other software. Rather like the mtoa module file sets PATH when you start Maya.

NOTE In previous versions of MtoA, this would prevent MtoA from even loading.

kicking ass with debug shading


You can use kick to render with debug shading. Here’s the flags to use:

  • -is to ignore the shaders assigned to the shapes
    When you ignore shaders, a default utility shader is used to render the scene.
  • -sm sets the shade mode ( ndoteye lambert flat ambocc plastic metal)
  • -cm sets the color mode (color ng ns n bary uv u v dpdu dpdv p prims uniformid wire polywire obj edgelength floatgrid reflectline bad_uvs nlights id bumpdiff pixelerror)

Here’s some examples that show how to kick with different types of debug shading (I’ve used the Arnold Render View debug shading modes for these examples)


Debug shading kick flags
Basic: disable all shaders in the scene, switching to a gray ‘ndoteye’ shader; a very fast shading mode.
kick -is

or

kick -is -sm notdoteye
Lighting: renders the scene with a white lambert shader
kick -is -sm lambert
Occlusion: use ambient occlusion shading
kick -is -sm ambocc
Wireframe: displays geometry as a wireframe
 kick -is -cm polywire

or

kick -is -sm ndoteye -cm polywire
Normal: visualizes the normal vector (between 0 and 1, in tangent space)
 kick -is -sm flat -cm n
UV: displays the coordinates of the primary UV set (red=U, green=V)
 kick -is -sm flat -cm uv
Primitive ID: displays random colors based on the per-primitive (triangle, curve) index
 kick -is -sm flat -cm prims
Barycentric: displays intra-primitive parametric coordinates (barycentric for triangles, parametric length, and width for curve segments)
 kick -is -sm flat -cm bary
Object: displays random colors based on the per-object ID
kick -is -sm flat -cm obj

Using an operator to override parameters in an ass file


Arnold 5.1 adds operators, which among other things, allow you to override parameters in ass files loaded by procedural nodes.

Here’s a quick example using the brand new MtoA 3.0

I exported some particles from Softimage, loaded them into Maya with an aiStandin (aka an Arnold procedural), and then used a set_parameter operator to scale the radius by 0.5

Note that I connect my operator by setting the Target Operator in the Render Settings.
set_parameter_radius
I can chain two set_parameter operators together, to set the mode and then scale the radius:
set_parameter_mode_radius

compiled against non-compatible Arnold


If you see something like this:

[Arnold]: MAXtoA_Shaders.dll was compiled against non-compatible Arnold 5.0.2.1

it usually means you have an older Arnold trying to load something compiled with  a newer Arnold. There’s two common reasons for this happening:

  • The system PATH includes the location of the older Arnold, so the older Arnold is loaded instead of the Arnold version included with the plugin.
  • The plugin install is messed up, and has the wrong Arnold version in it.


Buying Arnold


get_arnold


Annual subscriptions

You get annual subscriptions from Autodesk resellers

You can get Arnold 5-packs at 50% of the usual price, or you can get single Arnold licenses at full price:

Monthly subscriptions

  • You can subscribe for one, two, or three months.
  • Monthly Subscriptions are £60 / €70 / $65 Per Month
  • Monthly subscriptions are available online from solidangle.com

Permanent licenses

Until 30 April 2018, you can still get permanent Arnold licenses. Contact your local Autodesk reseller.

Arnold light_groups and shadow_groups


Light linking in Maya, include/exclude objects for lights in CINEMA 4D, light masks in Houdini, inclusive/exclusive lights in Softimage, they all are translated to light_groups and shadow_groups in Arnold.

Here’s a sphere on a plane, with two area lights (cyan and green).

default

If we add a light_group to the sphere polymesh:

 use_light_group on
 light_group "CyanAreaLight"

then we get this (see below). The sphere is lit only by the cyan area light: the light_group is the lights that affect the object.

light_group_on_cyan
Note that the sphere still casts shadows from the green light, even the sphere isn’t lit by the green light. That’s because there’s no shadow_group, so all lights cast shadows from the object.

If we add a shadow group, so that the light_group and shadow_group are both “CyanAreaLight”, then the sphere is lit by the cyan light only, and casts shadows from the cyan light only.

use_light_group on
 light_group "CyanAreaLight"
use_shadow_group on
 shadow_group "CyanAreaLight"

light_shadow_groups_on_cyan

And finally, here’s the sphere when light groups are on, but there’s no lights in the light group:

use_light_group on
use_shadow_group on
 shadow_group "CyanAreaLight"

light_group_empty