[HTOA] How to…use append mode in Solaris


Append mode (aka check-pointing) allows you to restart an interrupted render, and render just the remaining tiles. Those tiles are “appended” to the tiles that were rendered before.

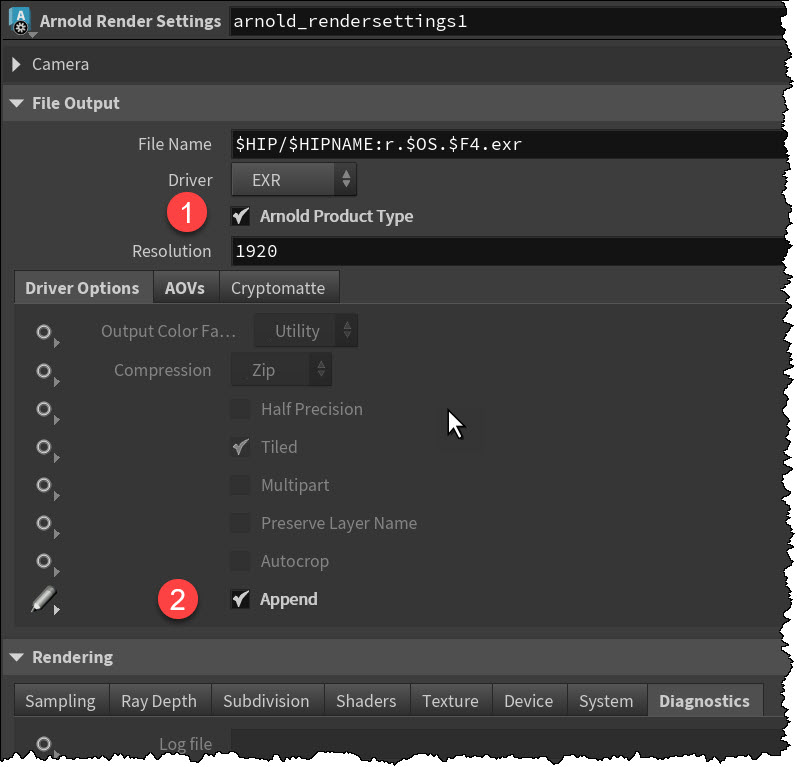
If you’re using the Arnold Render Settings LOP,  the Append check box is under File Output > Driver Options. You have to enable Arnold product type for any of the driver options to work.

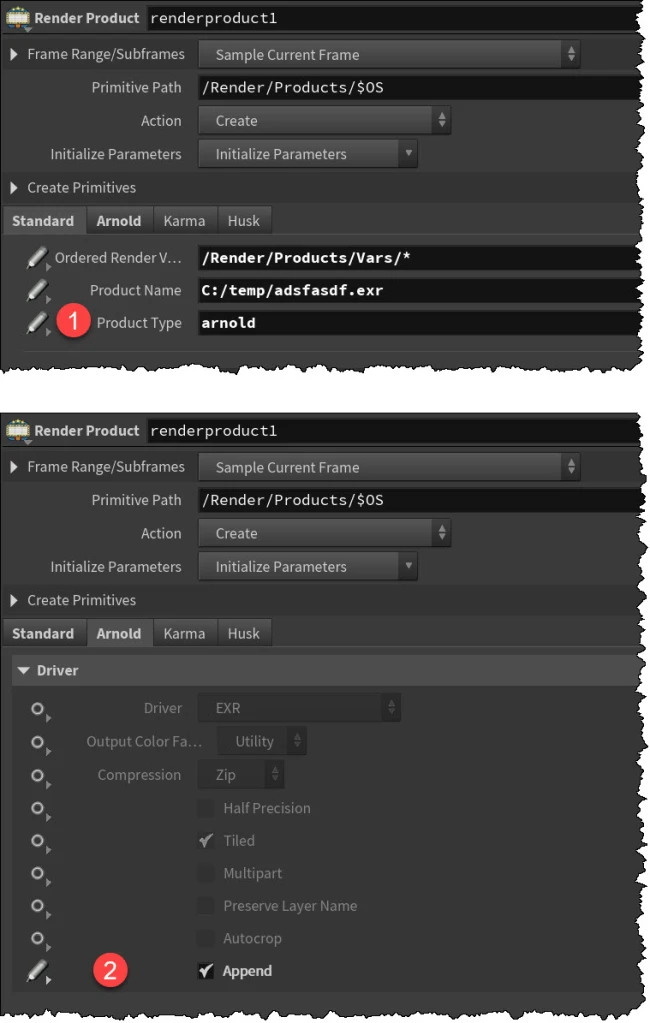
If you’re using the regular Render Settings LOP, you can turn on Append mode in the Render Product LOP. Don’t forget to change the Product Type to arnold.

HtoA: Denoising AOVs with the Arnold Denoiser


HtoA lets you edit the layer names, and that’s how to generate the variance AOVs for denoising.

  • Add two AOVs with the same name (I used “custom” here), but give the second one a “_variance” layer name (“custom_variance).
  • Change the Pixel Filter to variance.
  • Render some EXRs (in my screenshot below, I should the part of the Arnold log that tells you that the variance AOV was rendered too)
  • In the Arnold Denoiser, put the AOV names in the Light Group AOVs text box.

[MtoA] Denoising AOVs with the Arnold Denoiser


To denoise AOVs, you need to add variance AOVs:

  1. Enable Output Denoising AOVs
  2. Add a new output driver to the AOVs, and set the filter to variance
  3. Tell noice to denoise the AOVs: enter the AOV names in the Light Group AOVs text box (or, if you’re using the command-line, add -l flags for each AOV)

When you denoise the AOVs, you’ll see something like this in the Arnold Denoiser log:

C:\Program Files\Autodesk\Arnold\maya2020\bin\noice -i C:/project/images/denoiser_test.0002.exr -o C:/project/images/denoiser_test.0002_denoised.exr -ef 0 -sr 9 -pr 3 -v 0.5 -l diffuse -l direct -l indirect -l specular 

Denoising image C:/project/images/denoiser_test.0002.exr 
------------------------ (1/1)
noice 6.2.0.1 [903992ac] - the Arnold denoiser
Using 48 threads.
Loading images...
Loading file "C:/project/images/denoiser_test.0002.exr".
Using feature AOV 'diffuse_albedo' with filter 'gaussian_filter'
Using feature AOV 'N' with filter 'gaussian_filter'
Using feature AOV 'Z' with filter 'gaussian_filter'
Working with 1 frame at 960x540
Will denoise AOV "RGBA", using associated variance
   Output file will be "C:/project/images/denoiser_test.0002_denoised.exr"
Will denoise AOV "diffuse", using associated variance
   Output file will be "C:/project/images/denoiser_test.0002_denoised.exr"
Will denoise AOV "direct", using associated variance
   Output file will be "C:/project/images/denoiser_test.0002_denoised.exr"
Will denoise AOV "indirect", using associated variance
   Output file will be "C:/project/images/denoiser_test.0002_denoised.exr"
Will denoise AOV "specular", using associated variance
   Output file will be "C:/project/images/denoiser_test.0002_denoised.exr"
Start denoising (patch radius 3, search radius 9, variance 0.5)
Denoising RGBA
Denoising diffuse
Denoising direct
Denoising indirect
Denoising specular
Finished denoising
Saving image C:/project/images/denoiser_test.0002_denoised.exr (960 x 540 x 16)

[MAXtoA] Denoising AOVs with noice


First, set up your AOVs like this:

Then run noice like this:


set IMAGES="C:\Users\Stephen Blair\Documents\3ds Max 2020\renderoutput\denoiseme"

set ARNOLD_BIN=S:\solidangle\arnold\Arnold-6.0.2.0-windows\bin

%ARNOLD_BIN%\noice ^
-ef 2 -sr 2 -pr 2 -v 0.5 ^
-i %IMAGES%/AOVs0003.exr ^
-i %IMAGES%/variance0003.exr ^
-l diffuse ^
-l specular ^
-o %IMAGES%/denoised_AOVs0003.exr 

The AOVs and variance AOVs are in separate EXRs
That’s necessary to be able to have different filters for the same AOV in MAXtoA

Tip: In the Windows command prompt, you can use ^ (Shift + 6) character to indicate line continuation, and break long commands into multiple lines. You can also use ^ in in a batch file.

Updating MtoA 1.2.7.3 with Arnold 4.2.14.0


MtoA 1.2.7.3 ships with Arnold 4.2.13.

If you want to take advantage of the improvements in Arnold 4.2.14.0 (like the increase  in the maximum number of threads from 128 to 256), here’s what you need to do:

  • Download  Arnold 4.2.14.0 and extract the archive
  • Replace Arnold (libai.so, ai.dll, libai.dylib), kick, and maketx in the MtoA bin folder with the versions from the Arnold 4.2.14.0 download
  • Replace the Arnold Python bindings in  the MtoA scripts/arnold folder with the Python bindings from the Arnold python/arnold folder. For example, replace this folder:
       C:\solidangle\mtoadeploy\2016-1.2.7.3\scripts\arnold

    with the python\arnold folder from the Arnold 4.2.14.0 download. For example:

       C:\solidangle\arnold\Arnold-4.2.14.0-windows\python\arnold

You must update the Arnold Python bindings, otherwise MtoA won’t load. That’s because Arnold 4.2.14.0 included a number of API changes, including the removal of some API (like AiLicenseSetServer). The older Python bindings still refer to the removed API, so there will be Python errors that prevent MtoA from loading.

[Arnold] Rolling shutter in a nutshell


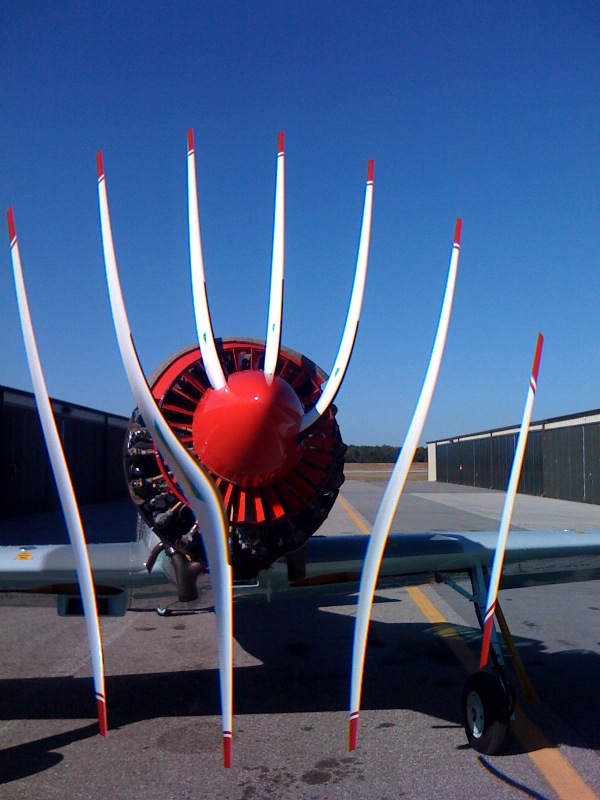
What’s rolling shutter? It’s an effect, or artifact, that looks like like this:
3192314056_fa8b5160d2_o

Rolling shutter means that the image isn’t captured all at once, but one scanline at a time:

Lee posted a video walk through of how to get the rolling shutter effect with Arnold. He used C4DtoA, but it’s basically the same recipe in any of the Arnold plugins:

  • Your geometry has to be spinning fast (like a propeller 😉
  • Select your camera, and enable Rolling Shutter. Leave the duration at 0.
  • In the Render Settings, enable motion blur (you don’t need deformation blur, or camera blur).
  • Adjust the number of motion keys, and the shutter length, to taste. As you increase the shutter length to exaggerate the effect, you’ll need more motion keys.

Update: And here’s some more interesting experiments with the rolling shutter effect

[Arnold] Tips for reducing noise when rendering interior scenes with indirect lighting


Indirect lighting of interior scenes can be a challenge, but there are some things you can do. In this post, we’ll give you some quick tips, but you can find more detailed information on support.solidangle.com, both for interior lighting and for troubleshooting noise.

Avoid the Skydome and use a Sky background and Quad lights

Instead of using a Skydome light, use a Sky for the background and quad lights for the light coming in through the windows. The quad lights should just barely cover the entire window.

If there’s anything visible outside the window, you may want to put a spot light on them. Just be careful not to let the spot light go into the room.

Use a distant light to simulate beams of light coming into the room

A distant_light is an easy-to-use option that perfectly matches sun light.

Spot lights don’t produce realistic sun beams since the beams look like they’re expanding, which sun beams don’t do. Moving the spot light further back, and also making sure it’s no larger than it needs to be to illuminate the window, will reduce noise and make it look more realistic.

Don’t put lights too close to the windows

If a light is too close to the window, that means the light hitting the window area is significantly more concentrated and so much brighter than the light hitting the far side of the room and so this produces more noticeable noise.

Make sure your materials are physically based

For example, don’t shade the room Standard shaders with a Diffuse weight of 1, and Diffuse color full white (1 1 1). I don’t think there’s any material known to man that is this reflective. Lowering the Diffuse weight to 0.7 will roughly match white paint and it will also get rid of noise. If it’s too dark, then try increasing the intensity of the lights, increase the number of diffuse bounces, or increase the camera’s exposure.

For a richer look, avoid fake lights inside the room

Consider getting rid of any fake lights you may have inside the room, and instead increase the number of diffuse and glossy bounces in order to get an even more realistic look, not to mention make the lighting easier. Doing that does increase render times, unfortunately, but does give a richer look.

hat tip: Thiago
[RLM] Reserving licenses


Reserving licenses is an RLM feature and is documented in the RLM User Guide (see “The ISV Options File” section).

You use the RESERVE keyword in the ISV options file (solidangle.opt) to reserve licenses for specific users, machine names, or IP addresses.

For example, this reserves 2 licenses for machines with the specified IP addresses:

INTERNET_GROUP renderfarm 192.168.221.1 192.168.223.1 
RESERVE 2 arnold group renderfarm 

This reserves five licenses for named users:

GROUP myusergroup steve stephen steven stevie stevo
RESERVE 5 arnold group myusergroup 

You can edit the ISV options in the RLM Web Admin page. You need to restart the ISV server after you change the options. Here’s a short video walkthrough (no audio).

[C4DtoA] Render failed! Please check the log for more details.


c4dtoa_render_failed

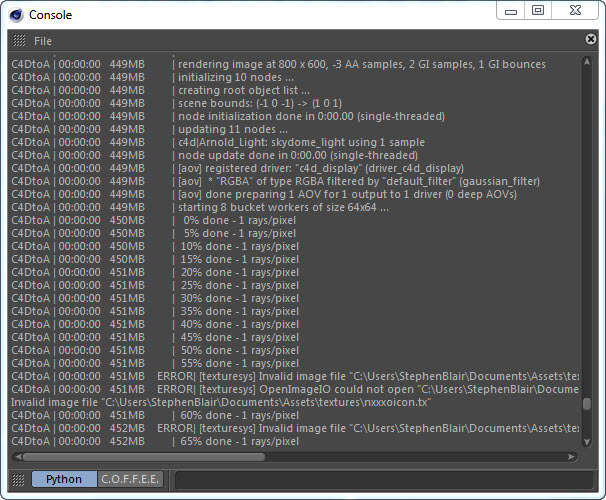
The Arnold log is important, not just for troubleshooting and getting help from us at Solid Angle, but also for understanding what’s going on when Arnold renders your scene.

But, first things first: where’s the log? The Arnold log is output to the Cinema 4D Console:
c4dtoa_console

To open the Console, click Script > Console.
c4dtoa_script_console

You can set the verbosity level in the Render Settings > Diagnostics. By default, the verbosity level is Warnings, but by increasing it to Info, you’ll get the % done log entries. You can also send the log to a file (good for logging support cases!).
c4dtoa_diagnostics