[SItoA] Doing a license check in Softimage


Setting up the environment right is what often goes wrong. Running kick -licensecheck from inside Softimage is a quick way to check that you set up the environment variables correctly.

Here’s two lines of Python that will open a command prompt and run kick -licensecheck (on Windows).

#Python
from subprocess import Popen
Popen(["cmd", "/K", XSIUtils.BuildPath( Application.Plugins('Arnold Render').OriginPath, 'kick.exe' ), "-licensecheck"])

Here’s the same thing, but broken down a bit for legibility:

#Python
si = Application

p = si.Plugins('Arnold Render')
sKick = XSIUtils.BuildPath( p.OriginPath, 'kick.exe' )

from subprocess import Popen
Popen(["cmd", "/K", sKick, "-licensecheck"])

[MtoA] Doing a license check in Maya


If you’re doing technical support like me, you gotta love things like kick -licensecheck. I wish we’d had something like this at Softimage. This license check will tell you:

  • Whether you can connect to a license server
  • What licenses are available
  • What are the licensing environment variable settings

licensecheck

In this example, I’m running Maya and the license server on the same computer. That’s why none of the environment variables are set, but the licensecheck still shows that there’s a license available. By default, Arnold will connect to 5053@localhost to get a license.

AOV Composition and opacity


AOV Composition allows opacity and transparency to carry forward into AOVs. It works only for RGB AOVs, so you won’t see it in the render region (because the xsi display driver always outputs RGBA AOVs).
aov_composition

For example, suppose you have a textured grid with an opacity map:
noicon_grid_w_opacity_map
In the render region, the Main AOV is fine, but the Arnold Direct Diffuse doesn’t have the opacity, even if you enable AOV Composition:
main_vs_direct_diffuse1
However, if you render out the image (with AOV Composition enabled and the Direct Diffuse format set to RGB), you’ll get what you expected:
arnold_direct_diffuse_aov_composition

SITOA: Adding Arnold materials through scripting


If you want to apply Arnold materials through scripting, there are a couple of undocumented commands you can use:

  • SITOA_AddMaterial takes the shader family (for example, Material or Texture) and the name of a shader, and connects that shader to the surface port on the Material node.
    # Add a standard material to the selected object
    SITOA_AddMaterial( "Material", "standard" )
    
    # Add ambient_occlusion to the selected object
    SITOA_AddMaterial( "Texture", "ambient_occlusion" )
    
  • SITOA_AddShader is similar, but it also takes a connection point as an argument, so you can connect to a specific port, such as the Environment or Displacement port.
    # Add a vector displacement shader
    SITOA_AddShader("Texture", "sta_vector_displacement", "displacement" )
    

However, neither of these commands return anything. So if you wanted to name the material, it’s not so easy. SITOA_AddMaterial does apply to the selection, so you could go through the selection to get the new material:

# Python
Application.SITOA_AddMaterial("Material", "standard")
sel = Application.Selection
mat = sel(0).Material
mat.Name = "MyStandardMaterial77"

You could write your own function with X3DObject.AddMaterial.

Here’s the simplest possible version. I don’t specify the path to a preset, just the name of the shader. That’s not terribly efficient, because Softimage now has to search for the preset (and that took about 0.2 seconds on my machine).

si = Application

def add_material( o, shader_name ):
	return o.AddMaterial( shader_name )

mat = add_material( si.Selection(0), 'Material', 'Standard' )
mat.Name = 'My_Standard_Mat'

Here’s a version that builds the path to the preset (just like the SITOA commands do), but that doesn’t require the shader family, just the name of the shader.

# dictionary of shader families, keyed by shader name
shader_types = {
  'ray_switch' : 'Material' , 
  'sta_vector_displacement' : 'Texture' , 
  'wireframe' : 'Material' , 
  'sta_displacement' : 'Texture' , 
  'ambient_occlusion' : 'Texture' , 
  'skin_sss' : 'Material' , 
  'sta_camera_projection' : 'Texture' , 
  'utility' : 'Texture' , 
  'bump3d' : 'Texture' , 
  'standard' : 'Material' , 
  'complex_fresnel' : 'Texture' , 
  'bump2d' : 'Texture' , 
  'motion_vector' : 'Material' , 
  'hair' : 'Material' , 
  'noise' : 'Texture' , 
  }


si = Application

def add_material( o, shader_name ):
	arnoldPlugin = si.plugins("Arnold Shaders");
	dspresets = XSIUtils.BuildPath( arnoldPlugin.OriginPath, '..', '..', 'Data', 'DSPresets' )
	mat = None
	if shader_name in shader_types:
		preset = XSIUtils.BuildPath( dspresets, 'Shaders', shader_types[shader_name], '%s.Preset' % shader_name )
		mat = o.AddMaterial( preset )
	return mat


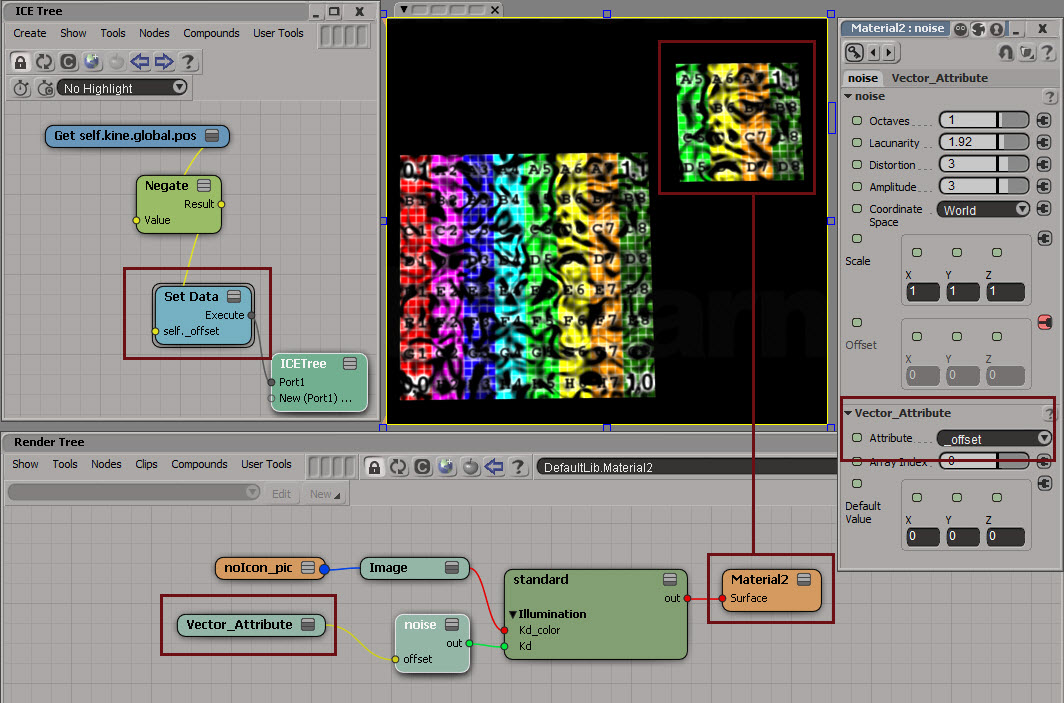
mat = add_material( si.Selection(0), 'noise' )

mat.Name = 'My_Noise'

The case of the license server that wasn’t releasing licenses


In this case, a customer reported that the license server wasn’t releasing licenses when a render node crashed.

Why did this happen? Because the customer had an older version of the license server that didn’t have a license TIMEOUT.

Since early 2012, the Solid Angle license server ships with a default TIMEOUT of 120 seconds. That means if a workstation stops sending heartbeats to the license server, then after two minutes the license server takes back the license. So, for example, if a workstation crashes or disconnects from the network, then the license server will take back the license after a couple of minutes.

The TIMEOUT is specified in a solidangle.opt file located in the RLM folder, along with rlm.exe and solidangle.set. Newer versions of the Solid Angle license server ship with this options file, but if you don’t have it, you can either upgrade your RLM or create the file yourself. Here’s what it should look like:

TIMEOUT 120 arnold

You’ll need to restart the server to read the new options.

What are heartbeats? Heartbeats are messages sent from a licensed application to the license server while the application has one or more licenses checked out from the server. You can see them with Process Monitor. In this screenshot, you can see that XSI.exe is sending a heartbeat every one minute to the license server.
heartbeats

If you need to free a checked out license, you can “remove” it (that’s RLM-speak for taking back a checked out license).

To remove a license in rlm admin (localhost:5054):

  • Click Status.
    Status
  • Under Server Status, click solidangle.
    ServerStatus
  • Under Show License Usage, click Usage.
    ShowLicenseUsage
  • Click Remove.
    LicenseUsage-Remove

Exporting ASS files from Softimage with xsibatch


You cannot use xsibatch -export to export ASS files (because of the way sitoa implements ASS exporting). But it’s not too hard to do the same thing with SITOA_ExportScene and xsibatch -script.

This is what the xsibatch command line would look like (on Windows). For readability, I used the EXPORT_SCRIPT and SCENE variables to reduce the length of the xsibatch command line.

set EXPORT_SCRIPT = batch_export_scene.pys
set SCENE = \\server\project\scenes\elephant_herd.scn
xsibatch -processing -script %EXPORT_SCRIPT% -args -start 5 -end 20 -step 1 -scene %SCENE%

And here’s the batch export script.

I expose the basic parameters only, and I use the ASS Archive output path from the Arnold Render options, the scene name, and the [Frame] token to compose the output file name.

def main( start, end, step, scene ):
	Application.OpenScene(scene, "", "")
	x = Application.Dictionary.GetObject( "Passes.Arnold_Render_Options" )
	dir = XSIUtils.ResolveTokenString( x.output_file_tagdir_ass.Value, 0, False, None, None )

	scn = Application.ActiveProject.ActiveScene.Parameters("Name").Value	
	output = XSIUtils.BuildPath( dir, '%s.[Frame].ass' % scn )

	Application.SITOA_ExportScene( start, end, step, False, False, output )

Pref coordinates and bind poses


The Noise shader can use different coordinate systems when it evaluates the noise.

  • Object space, where points are expressed relative to the local origin (center) of the object.
  • World space, where points are relative to the global origin of the scene.
  • Pref, which isn’t really a space, but rather a reference to a bind pose, which in Softimage is the top of the Modeling region. Pref is really a point in object space, but it’s a reference to the geometry at the top of the Modeling region. In constrast, if you use Object space, you’re getting point position coordinates from the very top of the whole operator stack.

Noise_Coords

The name “Pref” is easier to understand if you think of it like a variable name. So, when it comes to noise, P is a point in world space, Po is in object space, and Pref is in “reference space” aka the “bind pose”.

For the Noise shader, the advantage of using Pref is that it prevents the noise from swimming over the surface of the object as the object deforms (as long as the deforms are above the Modeling stack). As the object deforms, Po is a point on that deformed geometry, so Po is constantly changing. In contrast, Pref is a point on the geometry that came out of the Modeling stack. So the noise sticks to the “bind pose”.

Note the difference between Pref and the two other coordinate systems (World and Object).
BindPose

Noise, world coordinates, and offsets


If you’re using world coordinates for your noise, then obviously as an object moves in global space, the noise will change. Here I’ve extracted a polygon and moved it: same shader tree that uses noise, but different noise because I’m using world coordinates.
noise_world

You could keep the same noise by applying an offset equal to the translation:
noise_world_offset_1
Note that I’ve assumed that there’s no scaling of the noise. If there was, I’d have to multiply my offset by the same scaling.