Sampling after the first bounce


With the default Diffuse = 2 sampling, you’ll get four diffuse rays for each camera ray. Those four diffuse rays are the first bounce after the camera ray “hits” a shape.

diffuse_one_diffuse_bounce

After the first bounce, Arnold sets all the sampling settings back to 1, so for each of those four diffuse rays, you get one second-bounce diffuse ray. This prevents an exponential explosion of rays as secondary rays like diffuse rays bounce around a scene.

diffuse_two_diffuse_bounces

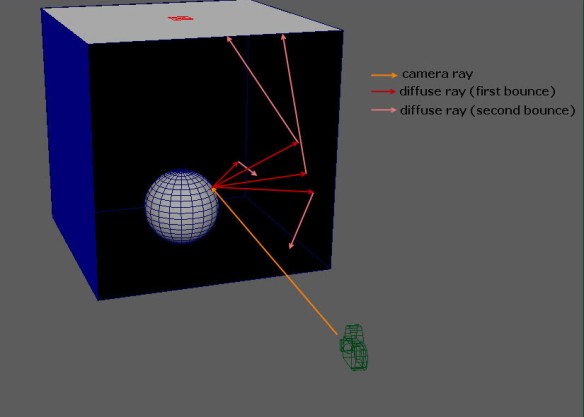
The same thing is true for the other secondary rays such as glossy, refraction, and shadow rays.

So, in summary:

  • For a camera ray you can get multiple secondary rays (for example, multiple diffuse rays or multiple glossy rays, and for light sampling, multiple shadow rays)
  • But for a secondary ray, you’ll get just one ray. For example: one diffuse ray, one glossy ray (if any), one shadow ray, and so on.

Rayswitching shadow rays


The ray_switch node lets you evaluate different shading trees for different ray types. In general, it’s used to provide a simpler shading tree for secondary rays, such as diffuse, glossy, or shadow rays. So when a camera ray hits the object, you can do one thing, but when a secondary ray hits the object, you can do another, simpler thing 🙂

For shadow rays, it’s not the color that matters, but whether the object blocks the shadow ray from a light. For example, if an object is opaque, then it doesn’t matter whether ray_switch returns red or blue or green or yellow for the shadow rays: the object is still opaque and blocking the light. So, you could use a ray_switch.shadow to plug in a simple standard shader that provides just the opacity mask.

ray_switch_shadow_opacity