
Here’s a snippet that shows how to create a simple four-polygon polymesh node with the Arnold Python API.
n = AiNode( "polymesh" )
AiNodeSetStr( n, "name", "grid" )

nsides = [4, 4, 5, 6]
AiNodeSetArray( n, "nsides", AiArrayConvert(len(nsides), 1, AI_TYPE_UINT, (c_uint*len(nsides))(*nsides) ) )

vidxs = [0, 1, 4, 3, 1, 2, 5, 4, 3, 4, 7, 6, 9, 4, 5, 11, 8, 10, 7]
AiNodeSetArray( n, "vidxs", AiArrayConvert(len(vidxs), 1, AI_TYPE_UINT, (c_uint*len(vidxs))(*vidxs) ) )

nidxs = [0, 1, 2, 3, 1, 4, 5, 2, 3, 2, 6, 7, 8, 2, 5, 9, 10, 11, 6]
AiNodeSetArray( n, "nidxs", AiArrayConvert(len(nidxs), 1, AI_TYPE_UINT, (c_uint*len(nidxs))(*nidxs) ) )

vlist = [-1, 0, -1, -1, 0, 0, -1, 0, 1, -0.197835326, 0, -0.742445886, 0, 0, 0, 0, 0, 1, 0.802164674, 0, -0.742445886, 1, 0, 0, 1, 0, 1, 0.270379633, 0, -1.21302056, 1, 0, 0.508926511, 0.496316135, 0, 1]
AiNodeSetArray( n, "vlist", AiArrayConvert(len(vlist), 1, AI_TYPE_FLOAT, (c_float*len(vlist))(*vlist) ) )

nlist = [0, 1, 0, 0, 1, 0, 0, 1, 0, 0, 1, 0, 0, 1, 0, 0, 1, 0, 0, 1, 0, 0, 1, 0, 0, 1, 0, 0, 1, 0, 0, 1, 0, 0, 1, 0]
AiNodeSetArray( n, "nlist", AiArrayConvert(len(nlist), 1, AI_TYPE_FLOAT, (c_float*len(nlist))(*nlist) ) )

m = AtMatrix( 	1, 0, 0, 0,
		0, 1, 0, 0,
		0, 0, 1, 0,
		0, 0, 0, 1 )

am = AiArrayAllocate(1, 1, AI_TYPE_MATRIX)
AiArraySetMtx( am, 0, m )

AiNodeSetArray( n, "matrix", am  )

AiNodeSetBool( n, "smoothing", True )

AiNodeSetByte(n, "visibility", 255 )

# Assign a shader to the polymesh node
u = AiNode( "utility" )
AiNodeSetStr( u, "name", "aiUtility1" )

AiNodeSetPtr( n, "shader", u )
And here’s the resulting node in the ASS file:
polymesh
{
name grid
nsides 4 1 UINT
4 4 5 6
vidxs 19 1 UINT
0 1 4 3 1 2 5 4 3 4 7 6 9 4 5 11 8 10 7
nidxs 19 1 UINT
0 1 2 3 1 4 5 2 3 2 6 7 8 2 5 9 10 11 6
vlist 12 1 POINT
-1 0 -1 -1 0 0 -1 0 1 -0.197835326 0 -0.742445886 0 0 0 0 0 1 0.802164674 0 -0.742445886 1 0 0
1 0 1 0.270379633 0 -1.21302056 1 0 0.508926511 0.496316135 0 1
nlist 12 1 VECTOR
0 1 0 0 1 0 0 1 0 0 1 0 0 1 0 0 1 0 0 1 0 0 1 0 0 1 0 0 1 0 0 1 0 0 1 0
smoothing on
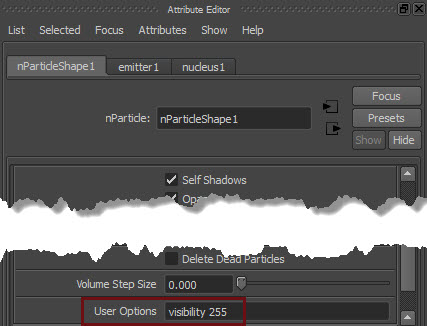
visibility 255
matrix
1 0 0 0
0 1 0 0
0 0 1 0
0 0 0 1
shader "aiUtility1"
}


