[MtoA] [Arnold] The case of the mesh light and the facing-ratio material


In this case, we have a torus as a mesh light.

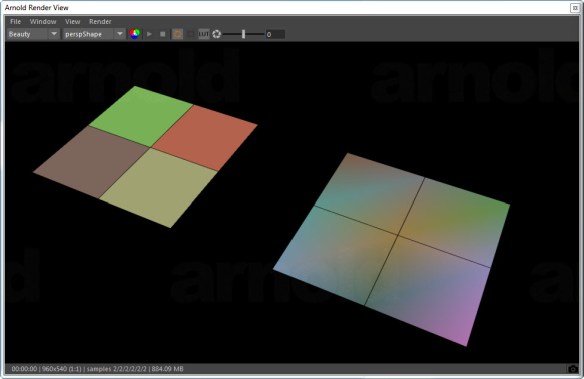
The mesh light color is facing-ratio ramp, so that in the Beauty AOV, the polygons facing the incoming camera ray are red, and polygons facing away are green.

facing-ratio-1

The plane below the light has a [slightly non-realistic] combination of diffuse, specular, and reflection (Kd=0.7, Ks=0.5, Kr=0.2).

The question here is: why do we see red in the reflection AOV, but green only in the diffuse and specular AOVs? Why does the facing-ratio ramp return red for reflection rays, but green for diffuse and glossy rays?

The answer is that there are no diffuse or glossy rays in this situation. A mesh light gets a meshLightMaterial shader, which MtoA assigns to the mesh light color (and to the torus shape) when MtoA translates the scene to Arnold.

The meshLightMaterial shader doesn’t handle diffuse, glossy, or shadow rays. The first few lines of the meshLightMaterial shader look like this:

if (sg->Rt & (AI_RAY_DIFFUSE | AI_RAY_GLOSSY | AI_RAY_SHADOW))
 {
 sg->out.RGBA = AI_RGBA_BLACK; 
 return;
}

Let’s take a look at what’s happening in the different AOVs.
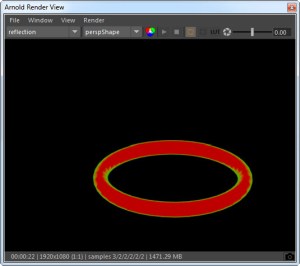
Reflection

The reflection rays hit the bottom of the torus, go through the facing-ratio ramp, and return red because most of the polygons are facing down towards the plane. In this case, we get the facing ratio of the polygon normals and the reflection ray.
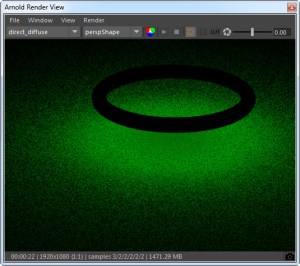
facing_ration_reflection

Specular

We get the green from the light sampling, where there’s no rays.

facing-ratio-glossy

Since there’s no rays, we get the dot product of the surface normal and  0 0 0, which is 0. And that returns green from the ramp:

facing-ratio-ramp

Diffuse

The diffuse rays don’t make a contribution (because the meshLightMaterial doesn’t handle them) so we get green from the light sampling (just like for specular).

facing-ratio-diffuse

Indirect Specular

This would be black, since the meshLightMaterial doesn’t handle glossy rays, so the mesh light makes no contribution to the glossy reflections.

[MtoA] mtoa missing from Plug-in Manager


If mtoa.mll is not listed in the Plug-in Manager, that means that Maya did not find the MtoA module file (mtoa.mod). And if you try to manually load mtoa.mll, you’ll get errors like this:

// Error: file: C:/Program Files/Autodesk/Maya2016/scripts/others/pluginWin.mel line 781: Unable to dynamically load : C:/solidangle/mtoadeploy/2016/plug-ins/mtoa.mll
The specified module could not be found. // 
// Error: file: C:/Program Files/Autodesk/Maya2016/scripts/others/pluginWin.mel line 781: The specified module could not be found. (mtoa) //

To load MtoA, you need to make sure that Maya finds the MtoA module file.

By default, the MtoA installer puts the mtoa.mod file in the user’s modules folder. For example:

C:\Users\StephenBlair\Documents\maya\2016\modules

If you installed MtoA using one user account, and try to run Maya with a different user account, Maya will not find the module file.

The module file has to be in the MAYA_MODULE_PATH. For example, for the user account “StephenBlair”, here are the default places where Maya looks for modules:

  • C:/Program Files/Autodesk/Maya2016/modules
  • C:/Users/StephenBlair/Documents/maya/2016/modules
  • C:/Users/StephenBlair/Documents/maya/modules
  • C:/Program Files/Common Files/Alias Shared/Modules/maya/2016
  • C:/Program Files/Common Files/Alias Shared/Modules/maya
  • C:/Program Files/Common Files/Autodesk Shared/Modules/maya/2016

If you want MtoA to available to all users, then you could copy mtoa.mod to one of the common locations.

[MtoA] Adding per-face and per-vertex user data


With Maya and MtoA, there’s no easy way to add per-face and per-vertex user data attributes to objects. You’ve got to do it with scripting: add an array attribute with addAttr and then provide the values. For example, here’s how to add per-face and per-vertex attributes, which MtoA will translate to UNIFORM (per-face) and VARYING (per-vertex) user data on the shape.

import maya.cmds as cmds
# Add UNIFORM (per-face) user data
cmds.addAttr("pPlaneShape1", dataType="vectorArray", longName="mtoa_uniform_myPerPolyColor")
cmds.setAttr("pPlaneShape1.mtoa_uniform_myPerPolyColor", 4,(0.48, 0.39, 0.35), (0.62, 0.63, 0.44), (0.47, 0.69, 0.33), (0.70, 0.38, 0.29), type="vectorArray")

# Add VARYING (per-face vertex) user data
cmds.addAttr("pPlaneShape2", dataType="vectorArray", longName="mtoa_varying_myPerPointColor")
cmds.setAttr("pPlaneShape2.mtoa_varying_myPerPointColor", 9, (0.46, 0.55, 0.66), (0.29, 0.40, 0.38), (0.69, 0.43, 0.68), (0.36, 0.58, 0.55), (0.59, 0.48, 0.27), (0.55, 0.52, 0.70), (0.48, 0.35, 0.26), (0.46, 0.46, 0.47), (0.34, 0.55, 0.31), type="vectorArray" )

After you run the script to add the attributes, you can use the aiUserData shaders to get the user data values and use them in your shader trees.

aiUserDataColor

For example, here’s the per-face and per-vertex user data colors on a simple grid:

uniform_varying_user_data

The case of the blue render view


Reason #35 why you should check the Arnold log

In this case, a scene that used to render yesterday, now just resulted in a blue render view, like this:

blue_render_view

Anytime the render view doesn’t update when your render, you can be fairly sure there’s some ERROR in the Arnold log.

In this case, the problem was a broken path to the IES file used by a photometric light. In the Arnold log, there was this ERROR:

00:00:04 870MB ERROR | [photometric] can't open C:/Assets/IES/example.ies

It’s easy to say “check the log”, but where do you find the log? It’s not like there’s a nice, color-coded button (red for error) on the render view UI that will pop up the log for you.

  • On Windows, you should see the Arnold log in the Output Windows. However, I find that this happens only when I start Maya from the command line. If I start Maya from the Windows Start menu, the Arnold log messages don’t show up in the Output Window. So I have to enable file logging, and check the log file.
  • On OSX and Linux, you’ll also have to enable file logging, unless you start Maya from a terminal.

Update: For Google:

  • Arnold renders a black screen
  • Arnold renders a blue screen


WARNING mtoa_shading_groups: unresolved reference


Any time you see “node … is not installed” and “unresolved reference” warnings when you try to kick an ASS file exported from Maya, the problem is missing MtoA shaders.


00:00:00 18MB WARNING | [ass] line 259: node "MayaFile" is not installed
00:00:00 18MB WARNING | [ass] line 288: node "MayaShadingEngine" is not installed

00:00:03 23MB WARNING | [ass] line 238: pSphereShape1.mtoa_shading_groups: unresolved reference to 'aiStandard2SG'
00:00:03 23MB WARNING | [ass] line 137: aiSkyDomeLightShape1.color: unresolved reference to 'file1'
00:00:03 23MB WARNING | [ass] line 188: pPlaneShape1.shader: unresolved reference to 'aiStandard1SG'
00:00:03 23MB WARNING | [ass] line 197: pPlaneShape1.mtoa_shading_groups: unresolved reference to 'aiStandard1SG'
00:00:03 23MB WARNING | [ass] line 229: pSphereShape1.shader: unresolved reference to 'aiStandard2SG'

When you render with kick, you need to specify the location of the MtoA shaders. You can do this several ways:

  • Set the ARNOLD_PLUGIN_PATH environment variable. For example:
    export ARNOLD_PLUGIN_PATH=/home/render/solidangle/mtoa/2016/shaders
    set ARNOLD_PLUGIN_PATH=C:\solidangle\mtoadeploy\2016\shaders
  • Use the kick -l flag to specify the MtoA shader location.
  • In Maya, set the Shader Search Path in the Arnold Render Settings, then export the ASS file.

[MtoA] Per-light AOVs for volumes


Arnold 4.2.12.2 added support for per-light AOVs for volumetrics.

Here’s how to set up per-light AOVs in MtoA 1.2.6.0:

  1. In the light Attribute Editor, enter a name for the light group.
  2. Create a custom AOV for the light group. Give the AOV a name that starts with “volume_”. For example, if the light group name is “red”, then the AOV name is “volume_red”.

aov_light_group

[MtoA] Creating the defaultArnold nodes in scripting


Loading MtoA isn’t enough to create the defaultArnoldRenderOptions node. The defaultArnoldRenderOptions node isn’t created until a user opens the Arnold Render Settings for the first time.

In code, you can do it like this:

from mtoa.core import createOptions
createOptions()

# Set default render options
setAttr( "defaultArnoldRenderOptions.motion_blur_enable", 1 )

When createOptions() creates the defaultArnoldRenderOptions node, it also creates the defaultArnoldDisplayDriver, defaultArnoldDriver, defaultArnoldFilter nodes and hooks them up to the defaultArnoldRenderOptions node.

defaultArnoldRenderOptions

Note that for setting defaults like this, you can also user a userSetup.py file. createOptions() calls hook functions that you can implement in your userSetup.py.

[MtoA] MayaFile node uses a default color for missing textures


Here’s something important to remember when you’re debugging a scene…

By default, the MayaFile node uses a default color if a texture is missing.

MayaFile_Use_Default_Color

This means the render won’t abort because of missing textures, and you won’t see ERRORs like these in the Arnold log for missing texture files:

ERROR   |   [texturesys] OpenImageIO could not open "sourceimages/noicon.tx" as tx: Could not open file "sourceimages/noicon.tx"
ERROR   |   [texturesys] Invalid image file "sourceimages/noicon.tx"

So missing textures can easily go unnoticed.

If you need to disable Use Default Color for testing, an easy way is to export an ASS file and then render it with kick -set MayaFile.useDefaultColor false.

I suppose you could also modify the Maya scene file directly:

import maya.cmds as cmds
import os

def set_useDefaultColor(b):
    filenodes=cmds.ls(type="file")
    for item in filenodes:
        cmds.setAttr( "%s.aiUseDefaultColor" % item, b )

set_useDefaultColor( False )

And finally, you can change the default value of the Use Default Color parameter by adding this to shaders/mtoa_shaders.mtd:

[node MayaFile]
	[attr useDefaultColor]
		default		BOOL	false

ERROR | [mtoa] [xgenTranslator] Could not find xgen_procedural in search path $ARNOLD_PLUGIN_PATH


This error

ERROR   | [mtoa] [xgenTranslator] Could not find xgen_procedural in search path $ARNOLD_PLUGIN_PATH

happens only when MtoA is first loaded, and it can be safely ignored. It doesn’t cause any problems when you render, and MtoA loads the XGen procedural from the MtoA procedurals folder.

The error is a consequence of how MtoA searches folders when it loads extensions. If you really need to get rid of the error, you can try copying the xgen_procedural library to the MtoA shaders folder.

[MtoA] Is there an ARNOLD_PROCEDURAL_PATH environment variable?


No, there isn’t. HtoA recently added support for an ARNOLD_PROCEDURAL_PATH environment variable, but neither MtoA or Arnold itself support ARNOLD_PROCEDURAL_PATH.

Here’s a few things you can do:

  • If you’re kicking ASS files, you can set the procedural search path on the kick command line. For example, assuming ARNOLD_PROCEDURAL_PATH is set in your environment, you could do this on Windows:
       kick -set options.procedural_search_path %ARNOLD_PROCEDURAL_PATH%

    Or this on Linux or OSX:

       kick -set options.procedural_search_path $ARNOLD_PROCEDURAL_PATH
  • You could add the procedural search path to the system path (PATH on Windows, LD_LIBRARY_PATH on Linux, DYLD_LIBRARY_PATH on OSX). Arnold will then find the procedural by searching through the system path.
  • Maya, you can put an environment variable in the Procedural Search Path text box. Note that you have to use square brackets, like this: [ARNOLD_PROCEDURAL_PATH].
    procedural_search_path