To visualize the different mipmap levels, you can create a custom tx file with different textures for each mipmap level. It’s pretty easy to do with maketx. (or you can download this one)


First, to create the different mipmap levels, I use oiiotool (I use the one shipped with HtoA).
oiiotool --pattern checker:width=32:height=32:color1=1,0,1 8192x8192 3 -o 8192.tif
oiiotool --pattern checker:width=32:height=32:color1=1,0,1 8192x8192 3 -o 8192.tif
oiiotool --pattern checker:width=32:height=32:color1=1,0,0 4096x4096 3 -o 4096.tif
oiiotool --pattern checker:width=32:height=32:color1=1,.25,0 2048x2048 3 -o 2048.tif
oiiotool --pattern checker:width=32:height=32:color1=0,0,1 1024x1024 3 -o 1024.tif
oiiotool --pattern constant:color=1,1,0 512x512 3 -o 512.tif
oiiotool --pattern constant:color=0,1,1 256x256 3 -o 256.tif
oiiotool --pattern constant:color=.5,0,0 128x128 3 -o 128.tif
oiiotool --pattern constant:color=.5,.5,0 64x64 3 -o 64.tif
oiiotool --pattern constant:color=0,1,0 32x32 3 -o 32.tif
oiiotool --pattern constant:color=.5,0,.5 16x16 3 -o 16.tif
oiiotool --pattern constant:color=.82,.41,.12 8x8 3 -o 8.tif
oiiotool --pattern constant:color=0,.5,.5 4x4 3 -o 4.tif
oiiotool --pattern constant:color=0,.75,1 2x2 3 -o 2.tif
oiiotool --pattern constant:color=.5,.5,.5 1x1 3 -o 1.tif
You can’t use constant colors for all the levels, because OIIO will optimize your texture into a constant color and there won’t be any texture access.
Then I use the -mipimage flag to combine all the mipmap levels into a tx file:
maketx 8192.tif ^
-mipimage 4096.tif ^
-mipimage 2048.tif ^
-mipimage 1024.tif ^
-mipimage 512.tif ^
-mipimage 256.tif ^
-mipimage 128.tif ^
-mipimage 64.tif ^
-mipimage 32.tif ^
-mipimage 16.tif ^
-mipimage 8.tif ^
-mipimage 4.tif ^
-mipimage 2.tif ^
-mipimage 1.tif ^
-format exr -d half -o debug.tx
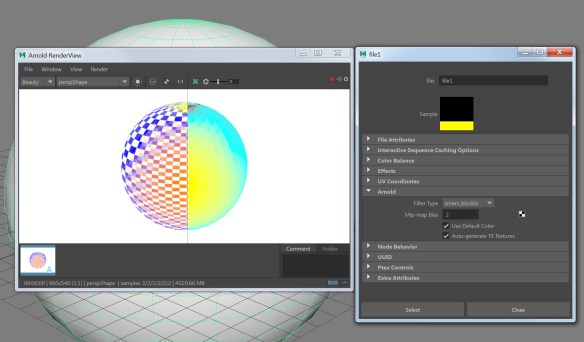
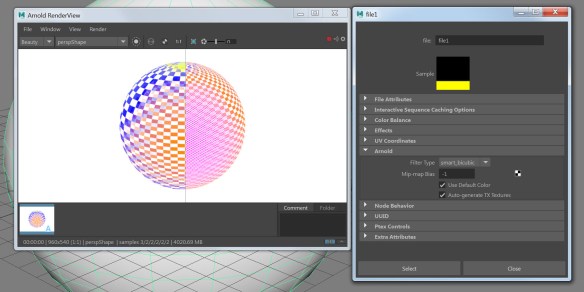
Here’s a couple of examples of using mip-map bias with the debug tx file.
Mip-map Bias = -1 (read a higher resolution mipmap)
Mip-map Bias = 2 (read two-levels lower resolution mipmap)