[MtoA] Exporting XGen archives


Finally, I have XGen > Generate > Export Selection as Archive working with Maya 2016 Extension 1 + SP5 on Windows 7.

I recently updated to SP5 from SP4, but I don’t know if that’s part of why the export works now. But I do know that I had to install mental ray for Maya 2016. I didn’t need to load Mayatomr, I just needed it installed. And then Export Selection as Archive worked!

PS I did see that thread on cgtalk about modifying xgenMR.py and xgenMRExport.py, but that didn’t work on my Windows 7 machine.

UPDATE: In summary, to export XGen archives, you need to:

  • install Mayatomr (but you don’t need to load it)
  • load xgenMR.py and xgenToolkit.mll

[Arnold] Do the right thing: use tx


Use tx textures. Don’t use png, jpg, tif, psd, or any other format. Convert them to tx.

Why not use those other formats?

  • Slow to load
  • Memory hungry if not tiled and mipmapped
  • Slow to render if textures exceed the texture cache size

Why use tx?

  • Fast to load
  • Efficient memory usage
  • Faster to render because they make better use of the texture cache
  • Optimizations such as the detection of constant colors and duplicate files


[Arnold] Minimum CPU requirements


Arnold 4.2.16.2 reduced the minimum requirement to SSE4.1

The latest Arnold 4.2.13.0 raises the minimum CPU requirements from SSE3 to SSE4.2:

  • CPUs need to support the SSE4.2 instruction set

If you want to check whether an older machine supports SSE, here’s a few suggestions:

  • Google your CPU and “SSE”
  • Windows: Download and run coreinfo -f
  • OSX: Run sysctl -a | grep machdep.cpu
  • Linux: Check /proc/cpuinfo

[MtoA] [Arnold] The case of the mesh light and the facing-ratio material


In this case, we have a torus as a mesh light.

The mesh light color is facing-ratio ramp, so that in the Beauty AOV, the polygons facing the incoming camera ray are red, and polygons facing away are green.

facing-ratio-1

The plane below the light has a [slightly non-realistic] combination of diffuse, specular, and reflection (Kd=0.7, Ks=0.5, Kr=0.2).

The question here is: why do we see red in the reflection AOV, but green only in the diffuse and specular AOVs? Why does the facing-ratio ramp return red for reflection rays, but green for diffuse and glossy rays?

The answer is that there are no diffuse or glossy rays in this situation. A mesh light gets a meshLightMaterial shader, which MtoA assigns to the mesh light color (and to the torus shape) when MtoA translates the scene to Arnold.

The meshLightMaterial shader doesn’t handle diffuse, glossy, or shadow rays. The first few lines of the meshLightMaterial shader look like this:

if (sg->Rt & (AI_RAY_DIFFUSE | AI_RAY_GLOSSY | AI_RAY_SHADOW))
 {
 sg->out.RGBA = AI_RGBA_BLACK; 
 return;
}

Let’s take a look at what’s happening in the different AOVs.

Reflection

The reflection rays hit the bottom of the torus, go through the facing-ratio ramp, and return red because most of the polygons are facing down towards the plane. In this case, we get the facing ratio of the polygon normals and the reflection ray.

facing_ration_reflection

Specular

We get the green from the light sampling, where there’s no rays.

facing-ratio-glossy

Since there’s no rays, we get the dot product of the surface normal and  0 0 0, which is 0. And that returns green from the ramp:

facing-ratio-ramp

Diffuse

The diffuse rays don’t make a contribution (because the meshLightMaterial doesn’t handle them) so we get green from the light sampling (just like for specular).

facing-ratio-diffuse

Indirect Specular

This would be black, since the meshLightMaterial doesn’t handle glossy rays, so the mesh light makes no contribution to the glossy reflections.

[Arnold] [kick] Enabling tiled EXRs


Suppose you have a load of ASS files that were exported with the Tiled option disabled. How could you re-enable the Tiled option without re-exporting the ASS files?

With the kick -set flag, that’s how:

kick -set display_exr.tiled on

That will set the tiled parameter for all EXR driver nodes in the ASS file.

If you want to set the flag for a specific driver node, you need to know the driver node name.

kick -set defaultArnoldDriver@driver_exr.RGBA.tiled on

That sets tiled for the driver_exr node named defaultArnoldDriver@driver_exr.RGBA.

[MtoA] mtoa missing from Plug-in Manager


If mtoa.mll is not listed in the Plug-in Manager, that means that Maya did not find the MtoA module file (mtoa.mod). And if you try to manually load mtoa.mll, you’ll get errors like this:

// Error: file: C:/Program Files/Autodesk/Maya2016/scripts/others/pluginWin.mel line 781: Unable to dynamically load : C:/solidangle/mtoadeploy/2016/plug-ins/mtoa.mll
The specified module could not be found. // 
// Error: file: C:/Program Files/Autodesk/Maya2016/scripts/others/pluginWin.mel line 781: The specified module could not be found. (mtoa) //

To load MtoA, you need to make sure that Maya finds the MtoA module file.

By default, the MtoA installer puts the mtoa.mod file in the user’s modules folder. For example:

C:\Users\StephenBlair\Documents\maya\2016\modules

If you installed MtoA using one user account, and try to run Maya with a different user account, Maya will not find the module file.

The module file has to be in the MAYA_MODULE_PATH. For example, for the user account “StephenBlair”, here are the default places where Maya looks for modules:

  • C:/Program Files/Autodesk/Maya2016/modules
  • C:/Users/StephenBlair/Documents/maya/2016/modules
  • C:/Users/StephenBlair/Documents/maya/modules
  • C:/Program Files/Common Files/Alias Shared/Modules/maya/2016
  • C:/Program Files/Common Files/Alias Shared/Modules/maya
  • C:/Program Files/Common Files/Autodesk Shared/Modules/maya/2016

If you want MtoA to available to all users, then you could copy mtoa.mod to one of the common locations.

[Arnold] ndoteye shade mode


The Utility shader has a super-fast ndoteye shading mode. This shading mode doesn’t trace any rays: it simply shades based on the angle between camera (eye vector) and  the surface normal (ndoteye = dot product of the Normal and Eye vectors).

Here’s an example of the Utility shader. The middle mesh has the ndoteye shade mode (the left mesh has plastic, and right ambocc).

ndoteye

Note that with ndoteye you get just black in the glossy reflection. That’s because in ndoteye shade mode, the Utility shader handles camera rays only. No secondary rays like glossy or refraction.

[MtoA] Adding per-face and per-vertex user data


With Maya and MtoA, there’s no easy way to add per-face and per-vertex user data attributes to objects. You’ve got to do it with scripting: add an array attribute with addAttr and then provide the values. For example, here’s how to add per-face and per-vertex attributes, which MtoA will translate to UNIFORM (per-face) and VARYING (per-vertex) user data on the shape.

import maya.cmds as cmds
# Add UNIFORM (per-face) user data
cmds.addAttr("pPlaneShape1", dataType="vectorArray", longName="mtoa_uniform_myPerPolyColor")
cmds.setAttr("pPlaneShape1.mtoa_uniform_myPerPolyColor", 4,(0.48, 0.39, 0.35), (0.62, 0.63, 0.44), (0.47, 0.69, 0.33), (0.70, 0.38, 0.29), type="vectorArray")

# Add VARYING (per-face vertex) user data
cmds.addAttr("pPlaneShape2", dataType="vectorArray", longName="mtoa_varying_myPerPointColor")
cmds.setAttr("pPlaneShape2.mtoa_varying_myPerPointColor", 9, (0.46, 0.55, 0.66), (0.29, 0.40, 0.38), (0.69, 0.43, 0.68), (0.36, 0.58, 0.55), (0.59, 0.48, 0.27), (0.55, 0.52, 0.70), (0.48, 0.35, 0.26), (0.46, 0.46, 0.47), (0.34, 0.55, 0.31), type="vectorArray" )

After you run the script to add the attributes, you can use the aiUserData shaders to get the user data values and use them in your shader trees.

aiUserDataColor

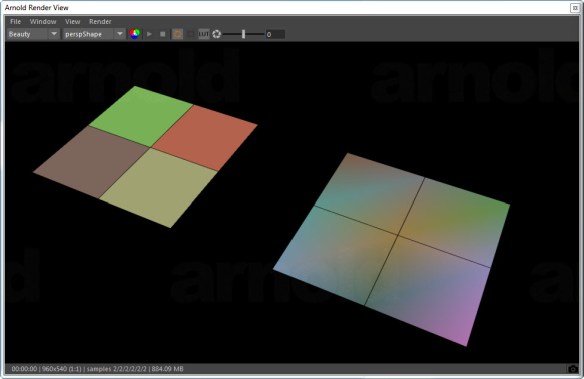
For example, here’s the per-face and per-vertex user data colors on a simple grid:

uniform_varying_user_data

[Tip] Save a few threads for yourself


As of Arnold 4.2.12.0, you can specify a negative number of threads, and Arnold will leave that many threads free. So, for example, if you want to leave two threads free for Maya while the IPR view is running, you would set the thread count to -2.

mtoa_threads

On a machine with 4 cores and 8 logical cores (aka threads):

| running on StephenBlair-PC, pid=16888
| 1 x Intel(R) Xeon(R) CPU E3-1240 V2 @ 3.40GHz (4 cores, 8 logical) with 16338MB
| Windows 7 Professional Service Pack 1 (version 6.1, build 7601)

You would then see that Arnold uses only 6 logical cores:

|  starting 6 bucket workers of size 64x64 ...

The advantage of the negative thread count is that you don’t have to know how many logical cores your machine has; you just need to know how many you want to keep free.